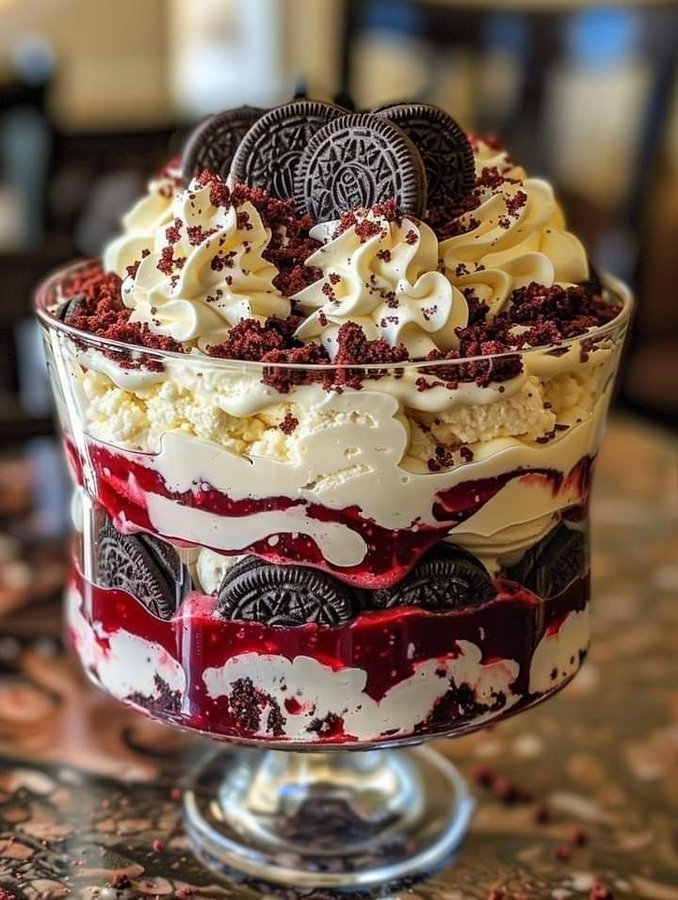
This Oreo Red Velvet Trifle recipe is a decadent and visually stunning dessert that combines the rich flavors of red velvet cake with the irresistible crunch of Oreo cookies. Perfect for special occasions or whenever you want to impress your guests with a show-stopping sweet treat, this trifle is a delightful marriage of textures and tastes that will leave everyone craving for more.
**Origin and History:**
The concept of trifles dates back to the 16th century in England, where it was traditionally made by layering sponge cake or ladyfingers with custard and fruits. Over time, this classic dessert has evolved into countless variations, each more indulgent than the last. The Oreo Red Velvet Trifle puts a modern twist on this timeless recipe by incorporating two beloved treats—red velvet cake and Oreo cookies—into a single, harmonious creation.
**Unique Ingredients and Flavors:**
What sets this Oreo Red Velvet Trifle apart is the combination of flavors and textures that come together to create a symphony of indulgence. The moist and velvety red velvet cake layers are interspersed with creamy layers of Oreo-flavored whipped cream and crushed Oreo cookies, providing a delightful contrast of smoothness and crunch in every bite. The deep cocoa notes of the red velvet cake complement the rich, chocolatey flavor of the Oreos, resulting in a dessert that is both sophisticated and comforting.


**Cooking Techniques:**
Creating this Oreo Red Velvet Trifle is a labor of love that requires a few key cooking techniques to ensure the layers are perfectly balanced and the flavors are well-developed. Baking a moist and tender red velvet cake is crucial, as it serves as the foundation of the trifle. The Oreo-flavored whipped cream should be whipped to just the right consistency—not too stiff, not too runny—to achieve a light and airy texture that melts in your mouth. Assembling the trifle is where the magic happens; layering the cake, whipped cream, and crushed Oreos in a clear glass trifle dish creates a stunning visual effect that will have your guests reaching for seconds.
**FAQ – How far in advance can I make this trifle?**
This Oreo Red Velvet Trifle is best assembled a few hours before serving to allow the flavors to meld together and the cake to soften slightly. However, you can prepare the components ahead of time and assemble the trifle up to 24 hours in advance. Just be sure to store it in the refrigerator to keep it fresh and delicious.
In conclusion, this Oreo Red Velvet Trifle is a show-stopping dessert that will dazzle your taste buds and impress your guests. With its luxurious layers of red velvet cake, Oreo-flavored whipped cream, and crunchy Oreo cookies, this trifle is a true indulgence that is perfect for any celebration or special occasion. So why wait? Whip up this delightful dessert and treat yourself to a taste of pure bliss!

Oreo Red Velvet Trifle
Description
Indulge in the ultimate dessert experience with this Oreo Red Velvet Trifle, a rich and luscious treat that combines the best of red velvet and Oreo flavors in every bite.
Ingredients
Trifle Layers
Instructions
Preparation
-
Prepare the ingredients
Gather Oreo cookies, red velvet cake, cream cheese, sugar, vanilla extract, heavy cream, and chocolate shavings.Ensure all ingredients are at room temperature for easier mixing.
Assembly
-
Layering
In a trifle dish, start with a layer of crumbled red velvet cake at the bottom.Ensure the cake layer is evenly spread and covers the bottom of the dish. -
Cream Cheese Mixture
In a bowl, beat cream cheese, sugar, and vanilla extract until smooth. In a separate bowl, whip heavy cream until stiff peaks form. Gently fold the whipped cream into the cream cheese mixture.Be gentle when folding to maintain a light and airy texture. -
Layering Continues
Spread a layer of the cream cheese mixture over the red velvet cake layer. Place a layer of crushed Oreo cookies on top.Repeat the layers until you reach the top of the trifle dish, ending with a layer of the cream cheese mixture. -
Decorate
Finish by sprinkling chocolate shavings over the top layer.Refrigerate the trifle for at least 2 hours before serving to allow the flavors to meld together.
Serving
-
Enjoy
Serve the Oreo Red Velvet Trifle chilled. Scoop out generous portions to reveal the beautiful layers.Garnish with extra Oreo crumbs or fresh berries for an added touch.
Note
- For a quicker version, use store-bought red velvet cake and whipped cream.
- Make sure the cream cheese is at room temperature for smooth blending.
- Crush the Oreo cookies into different sizes for texture variation.
- Drizzle some raspberry sauce between the layers for extra flavor.
- Refrigerate the trifle for at least 2 hours before serving to let the flavors meld.
- Garnish with fresh raspberries or chocolate shavings for a beautiful presentation.