
Introduction
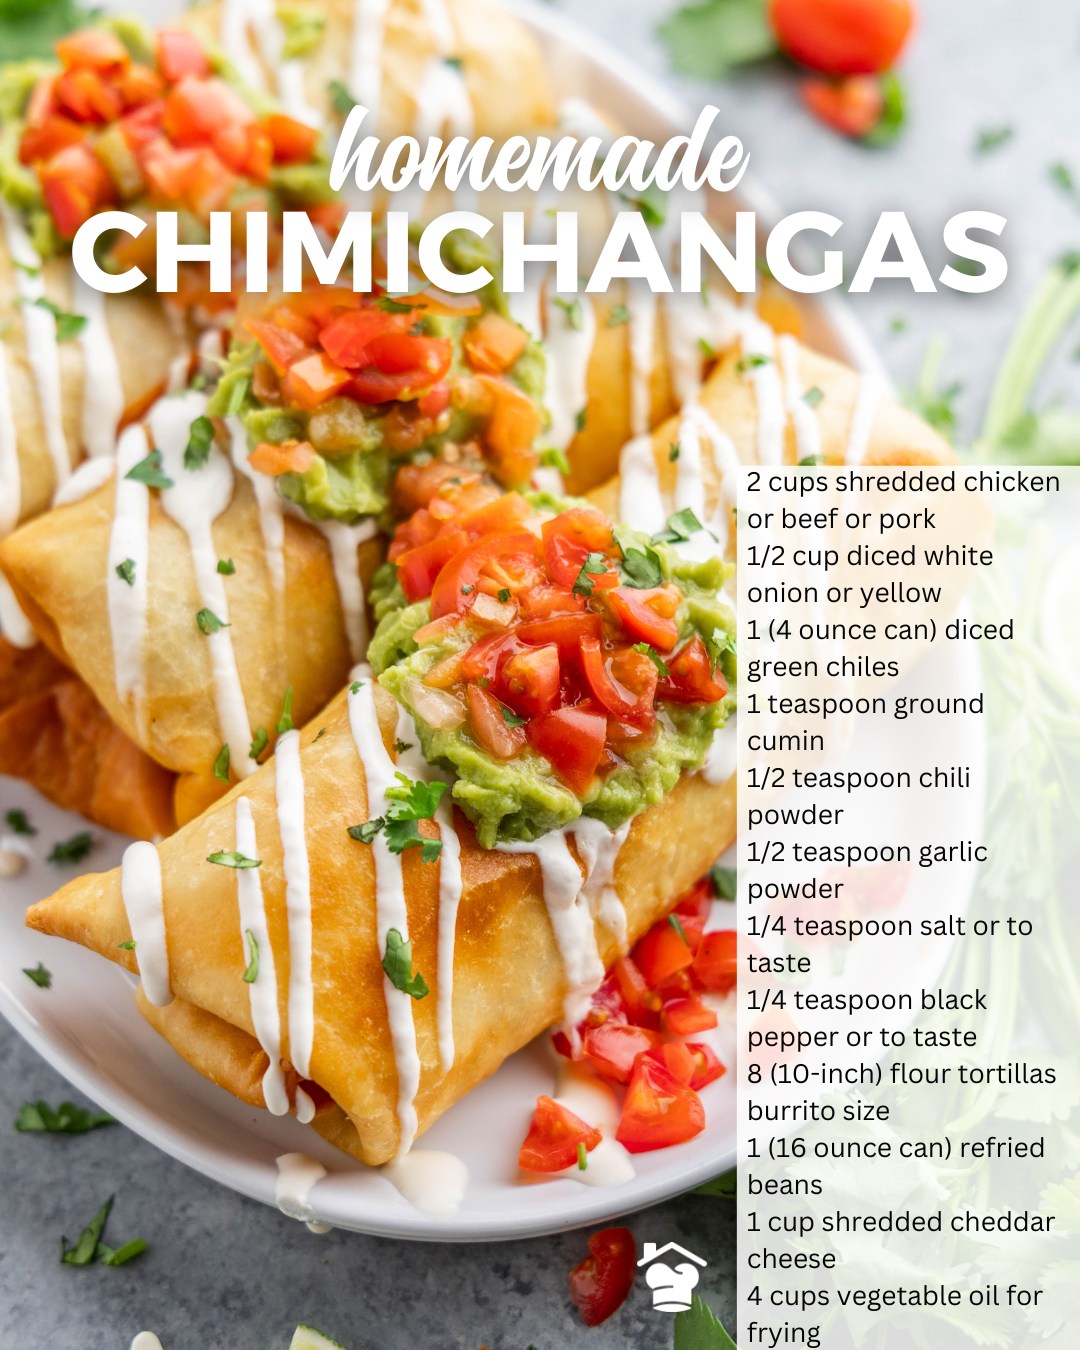
Chimichangas are a delightful Tex-Mex dish that combines the best of two worlds: a crispy, golden-brown exterior and a savory, flavorful interior bursting with fillings like seasoned meat, beans, and cheese. These homemade chimichangas provide a comforting and indulgent experience, perfect for a cozy dinner or a festive gathering. Let’s dive into the fascinating world of homemade chimichangas and unlock the secrets to creating these delicious parcels of joy in your own kitchen.
Origin and Cultural Significance
Originating in the southwestern United States, chimichangas have a rich history deeply rooted in Mexican cuisine. Legend has it that this dish was created by accident when a burrito was dropped into hot oil, resulting in a crispy, fried masterpiece. Over time, chimichangas have become a beloved staple in Tex-Mex cuisine, offering a delightful blend of flavors and textures. Whether enjoyed as a quick meal on the go or as a centerpiece at festive celebrations, chimichangas hold a special place in the hearts of food enthusiasts around the world.
Recipe’s Unique Ingredients
What sets homemade chimichangas apart is the careful selection of ingredients that come together to create a symphony of flavors. From tender shredded chicken or beef to creamy refried beans and gooey melted cheese, each component plays a crucial role in building the perfect chimichanga. Spiced with aromatic cumin, chili powder, and garlic, the filling tantalizes the taste buds with every bite. Wrapped in a flour tortilla and fried to golden perfection, these chimichangas are a crispy revelation waiting to be devoured.


Flavors and Cooking Techniques
The beauty of homemade chimichangas lies in the contrast of textures and flavors. The tender meat, the creamy beans, and the melted cheese create a harmonious blend that is both comforting and satisfying. The cooking technique of frying the chimichangas to crispy perfection adds a delightful crunch that elevates the dish to new heights. The secret to achieving the perfect chimichanga lies in frying at the right temperature to ensure a crispy exterior while keeping the fillings warm and gooey on the inside.
Step-by-Step Instructions
1. Begin by preparing the filling: Cook your choice of protein (such as shredded chicken or beef) with onions, garlic, cumin, chili powder, and salt until tender.
2. Add refried beans and mix well to create a creamy and flavorful filling.
3. Take a flour tortilla and spoon the filling onto the center. Top with shredded cheese.
4. Fold the sides of the tortilla over the filling, then roll it up tightly to form a burrito shape.
5. Heat oil in a pan for frying. Carefully place the chimichangas seam side down in the hot oil.
6. Fry until golden brown and crispy on all sides, turning occasionally for even cooking.
7. Remove from the oil and place on a paper towel-lined plate to drain excess oil.
8. Serve hot with your favorite toppings such as salsa, guacamole, sour cream, and fresh cilantro.
Pro Tips:
– For a healthier alternative, you can bake the chimichangas in the oven until crispy.
– Experiment with different fillings like black beans, pulled pork, or even shrimp for a unique twist.
– Customize the spice level to suit your taste by adjusting the amount of chili powder and hot sauce.
Frequently Asked Question
Can I make chimichangas ahead of time?
Yes, you can prepare the chimichangas ahead of time and store them in the refrigerator. When ready to serve, simply reheat them in the oven until warmed through and crispy.
Conclusion
Indulge in the crispy, savory goodness of homemade chimichangas and transport your taste buds to a fiesta of flavors. Whether you’re a seasoned chef or a beginner in the kitchen, these delicious parcels are sure to impress. So, gather your ingredients, roll up your sleeves, and embark on a culinary adventure that promises satisfaction with every bite. Dive into the world of homemade chimichangas and unleash your creativity in the kitchen!
Homemade Chimichangas
Description
Enjoy a fiesta in every bite with these golden, crispy Chimichangas filled with seasoned meat, beans, and cheese, then fried to perfection.
Ingredients
Chimichanga Filling
Chimichanga Assembly
Instructions
Preparation
-
Prepare the Filling
In a skillet, heat oil over medium heat and sauté onions, garlic, bell peppers, and your choice of protein until cooked through.Feel free to use ground beef, shredded chicken, or beans for a vegetarian option. -
Season the Filling
Season the filling with cumin, chili powder, salt, and pepper. Cook for an additional 2-3 minutes to let the flavors meld.Adjust the seasoning according to your taste preferences. -
Assemble the Chimichangas
Place a spoonful of the filling onto a flour tortilla, fold the sides over, then roll it up like a burrito.Make sure the filling is not too hot to handle before rolling.
Cooking
-
Fry the Chimichangas
Heat oil in a pan over medium-high heat. Carefully place the chimichangas seam side down and fry until golden brown and crispy on all sides.Don't overcrowd the pan to ensure even frying. -
Serve
Remove the chimichangas from the oil and place them on a paper towel-lined plate to drain excess oil. Serve with your favorite toppings like guacamole, sour cream, and salsa.Garnish with fresh cilantro for a burst of freshness.
Note
- For a healthier option, you can bake the chimichangas instead of frying them.
- Feel free to customize the filling with your favorite ingredients like shredded chicken, beef, or beans.
- Serve with guacamole, sour cream, and salsa for dipping.
- Leftover chimichangas can be stored in the fridge for up to 3 days and reheated in the oven for a crispy finish.