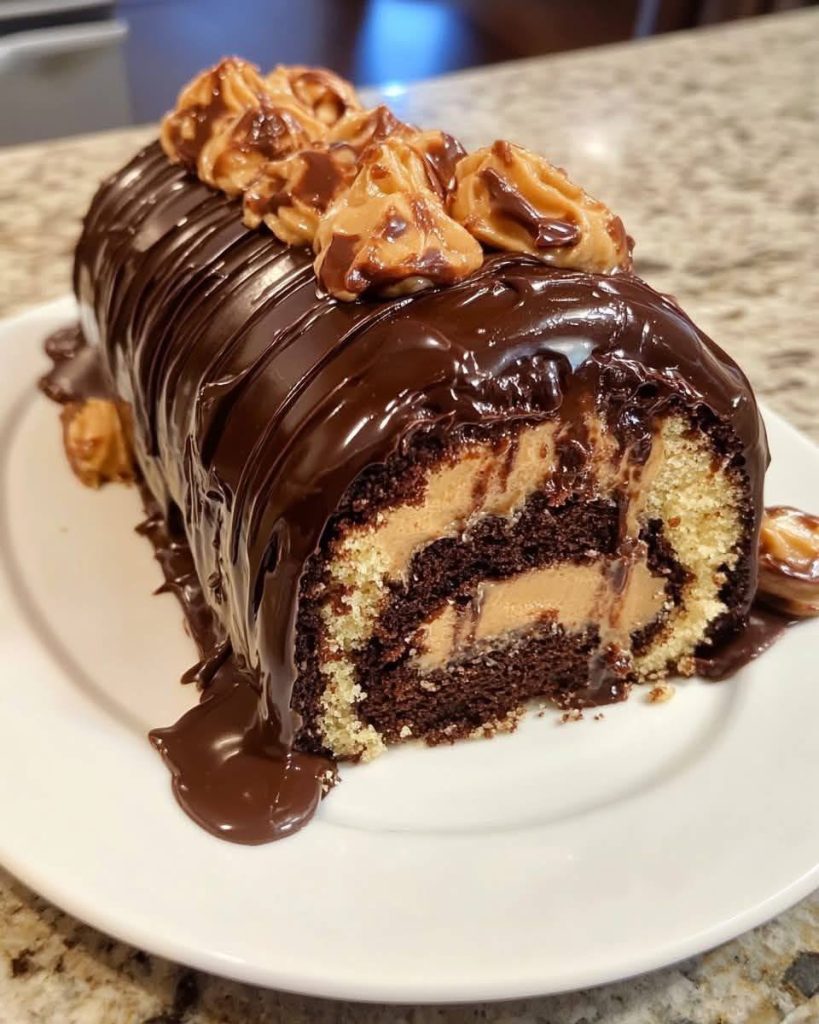
Picture this: the moment you slice into a velvety chocolate roll cake, revealing swirls of rich peanut butter cream nestled within like a hidden treasure. This Peanut Butter Cup Chocolate Roll Cake is a delightful confection that marries the rich decadence of chocolate with the creamy allure of peanut butter, creating an irresistible dessert that will have you reaching for seconds.
The Birth of a Classic Combination
Few combinations are as universally adored as chocolate and peanut butter. It’s a duo that has graced everything from candy bars to ice creams, each time creating that familiar, comforting blend that feels like a hug in edible form. The origin of this delightful pairing traces back to the early 20th century. Peanut butter, having been popularized at the 1904 World’s Fair, caught the culinary world’s imagination, and it wasn’t long before chocolatiers began experimenting with the nutty spread. Fast forward to the 1920s and 1930s, and peanut butter cups began to emerge, swiftly becoming a staple in American confectionery.
This roll cake takes inspiration from those iconic treats but elevates them, transforming a simple flavor combination into a sophisticated dessert. The roll cake format itself is a nod to European pâtisserie traditions, where roulades are celebrated for their elegant presentation and delightful texture. By combining this classic technique with an all-American flavor, we’re creating a truly international delight that resonates across cultures and generations.
Decadence Meets Simplicity
The beauty of this cake lies not just in its flavors but in its construction. Roll cakes, or Swiss rolls as they’re often known, might seem daunting at first glance, but they are surprisingly approachable. The sponge is light and airy, achieved through the careful folding of whipped egg whites into a chocolate batter. This technique ensures the cake remains pliable and soft, perfect for rolling without cracking.
The filling is where the magic happens. A luscious peanut butter cream, made by blending peanut butter with cream cheese and a touch of vanilla, provides a creamy, tangy counterpoint to the sweet chocolate sponge. This isn’t just any filling; it’s a deeply satisfying blend that mimics the texture of a classic peanut butter cup, yet offers a smoother, more refined consistency.
Ingredients with a Story
Every ingredient in this cake tells a story, from the humble cocoa powder that adds a deep chocolatey note to the cake, to the rich, creamy peanut butter, ideally one that’s just roasted enough to bring out its natural sweetness. When selecting ingredients, quality is paramount. A high-quality cocoa powder can make all the difference, imparting a depth of flavor that’s both robust and nuanced. Similarly, the choice of peanut butter can elevate the entire dessert, so opt for a smooth, natural variety without added sugars or oils for the best results.
The cream cheese in the filling adds a subtle tang, balancing the sweetness and enhancing the overall creaminess. And let’s not forget the finishing touch: a drizzle of chocolate ganache or a dusting of powdered sugar, which adds a touch of elegance and a hint of sweetness to each bite.
Crafting the Perfect Roll
The process of making a roll cake is as much about technique as it is about ingredients. The sponge must be baked just right—light enough to roll without breaking, yet sturdy enough to hold its shape. Timing is everything; the cake must be rolled while still warm to prevent cracks and to set its shape.
Rolling the cake can feel a bit like performing a culinary dance, requiring a gentle hand and a bit of patience. Once filled and rolled, the cake needs a moment to rest, allowing the flavors to meld together and the structure to settle. This waiting game is crucial, though challenging, as it builds anticipation for the final reveal.
A Journey of Flavor
This Peanut Butter Cup Chocolate Roll Cake is more than just a dessert; it’s a journey through flavors and textures, a testament to the power of combining classic elements in new and exciting ways. As you slice through its spirals, you experience a symphony of tastes and aromas that delight the senses. From the rich chocolate notes to the creamy, nutty filling, each bite is a celebration of culinary creativity and time-honored techniques.
Inviting you to experiment, this recipe not only showcases the beauty of a beloved flavor duo but also encourages you to put your own spin on it. Whether it’s adding a hint of sea salt to the filling or incorporating a layer of caramel for extra indulgence, the possibilities are endless. So, grab your apron, gather your ingredients, and dive into the delicious world of chocolate and peanut butter—your taste buds will thank you.

Peanut Butter Cup Chocolate Roll Cake
Description
This roll cake combines the heavenly duo of chocolate and peanut butter into a delightful dessert, perfect for celebrations or a special treat.
Ingredients
Chocolate Sponge Cake
Peanut Butter Filling
Chocolate Ganache Topping
Instructions
Preparing the Chocolate Sponge Cake
-
Gather and Prepare Ingredients
Preheat your oven to 350°F (175°C). Line a 10x15 inch jelly roll pan with parchment paper and lightly grease it. This prevents any sticky situations later.Ensure the parchment paper hangs over the edges slightly, making it easier to lift the cake out. -
Mix the Dry Ingredients
In a medium bowl, whisk together 3/4 cup of all-purpose flour, 1/4 cup of unsweetened cocoa powder, 1 teaspoon of baking powder, and a pinch of salt. This ensures an even distribution of flavors.Sifting the cocoa powder can help prevent clumps in your batter. -
Prepare the Wet Ingredients
In a large mixing bowl, beat 4 large eggs on high speed until thick and pale, about 4 minutes. Gradually add 3/4 cup of granulated sugar, continuing to beat until fully incorporated.The eggs should be at room temperature for maximum volume when whipped. -
Combine Wet and Dry Mixtures
Gently fold the dry ingredients into the egg mixture using a spatula. Do this in batches, being careful not to deflate the batter.A light hand here keeps the cake airy and tender. -
Bake the Sponge Cake
Spread the batter evenly into the prepared pan. Bake for 10-12 minutes or until the cake springs back when lightly touched.Overbaking will make rolling the cake more challenging, so keep a close watch!
Rolling and Filling the Cake
-
Roll the Cake
Immediately after removing the cake from the oven, dust it with cocoa powder. Place a clean kitchen towel over the cake, invert it onto a flat surface, and peel away the parchment. Roll the cake up gently with the towel inside and let it cool completely.This initial roll sets the shape, making it easier to fill later without cracking. -
Prepare the Peanut Butter Filling
In a bowl, beat 1 cup of creamy peanut butter with 1/2 cup of confectioners' sugar and 1/4 cup of softened butter until smooth and creamy.Adding a pinch of salt can enhance the peanut butter flavor. -
Unroll and Fill the Cake
Carefully unroll the cooled cake. Spread the peanut butter mixture evenly over the surface, leaving a small border around the edges.Avoid overfilling to prevent the filling from spilling out when rolled. -
Re-roll the Cake
Gently re-roll the cake without the towel. Wrap it tightly in plastic wrap and refrigerate for at least 1 hour to set.Chilling helps the cake hold its shape and makes slicing cleaner.
Finishing Touches
-
Prepare the Chocolate Ganache
Heat 1/2 cup of heavy cream until just simmering, then pour it over 1 cup of chopped semi-sweet chocolate. Let it sit for a minute, then stir until smooth.Use high-quality chocolate for the richest flavor. -
Decorate the Cake
Unwrap the chilled cake and place it on a serving platter. Pour the ganache over the top, allowing it to drip down the sides. Garnish with chopped peanut butter cups if desired.For a professional look, use a spatula to smooth the ganache evenly over the cake.
Note
For a perfect Peanut Butter Cup Chocolate Roll Cake, ensure your eggs are at room temperature for optimal volume when whipping. Use high-quality cocoa powder for a rich chocolate flavor. When spreading the batter, be gentle and even to prevent cracking. Roll the cake while warm—it’s more pliable and less likely to break. Chill thoroughly before filling to set the shape. For the filling, smooth out the peanut butter before folding it into the whipped cream to prevent lumps. Don’t rush the chilling process; a well-chilled roll holds its shape better when sliced. For a professional touch, dip a knife in hot water before slicing for clean, sharp cuts. If you wish, add a pinch of sea salt to the filling for a touch of contrast. For presentation, dust with cocoa or drizzle with melted chocolate. Store in the refrigerator for up to three days, wrapped tightly to maintain moisture. Consider adding chopped peanuts or mini peanut butter cups into the filling for added texture. If peanut allergies are a concern, substitute almond butter or sunflower seed butter. Experiment and enjoy!